Tu carrito está vacío
In order to provide you with a competitive quote, Please send us the following and we’ll get back to you as soon as we can:

Screen printing has been around for centuries, and it remains one of the most popular and versatile methods for transferring designs onto different materials. Whether you're an entrepreneur looking to start your own printing business, a DIY enthusiast, or simply curious about how screen printing works, this guide will walk you through every step of the process. From the basics of screen printing to advanced techniques, materials, and tips for success, this comprehensive guide will provide you with everything you need to master screen printing.
Screen printing, also known as silkscreen printing or serigraphy, is a technique where ink is applied to a surface through a mesh screen. This process involves creating a stencil (or screen) and using it to print a design onto various substrates like textiles, paper, metal, glass, or even wood. The versatility of screen printing has made it an essential tool in industries ranging from apparel and advertising to fine arts.
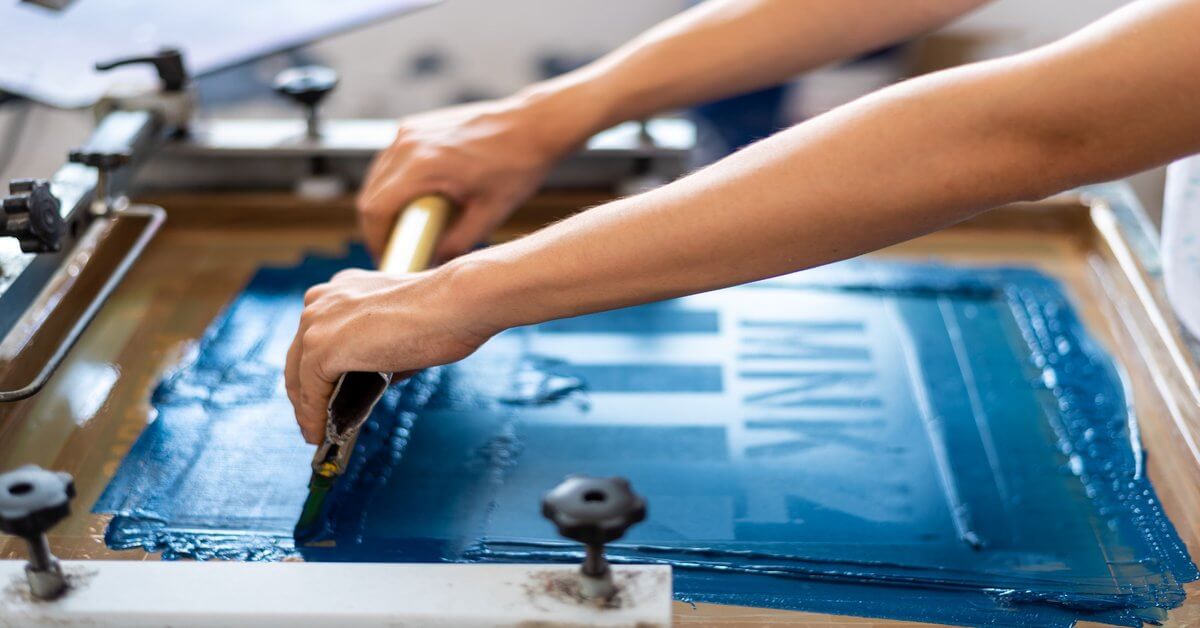
The technique works by pushing ink through a screen using a squeegee, ensuring only the open areas of the stencil allow ink to pass through. The results are vibrant and durable prints, known for their richness and longevity, making screen printing a popular choice for printing t-shirts, posters, and signs.
The origins of screen printing can be traced back over 1,000 years to ancient China, where stenciling techniques were used for artistic expression and practical purposes. By the time it reached Japan, silk mesh was adopted, allowing for finer, more detailed designs to be transferred onto fabrics. This use of silk led to the term "silkscreen" being coined.
Screen printing as we know it began to take shape in the 20th century, particularly during the 1930s when artists began to adopt the technique for creative expression. Notable artists like Andy Warhol and Roy Lichtenstein helped popularize screen printing in the art world, particularly through the Pop Art movement.
Screen printing also grew in the commercial world, making its way into industries that required mass production of designs on clothing, posters, and signage. Today, screen printing has been refined and improved by advances in technology, allowing for more efficient production and the ability to print on a wider variety of materials.
At its core, screen printing relies on the principle of pushing ink through a stencil. Here’s a simplified breakdown of how the process works:
Step 1: Design Creation
The first step in screen printing is creating the design you want to print. Designs can be created digitally or by hand, but they must be converted into a format suitable for printing. The design is usually separated into layers for each color in the design.
Step 2: Preparing the Screen
The screen is a mesh, typically made from polyester, stretched over a frame. A light-sensitive emulsion is applied to the screen, and the design is printed onto a transparent film. When exposed to UV light, the emulsion hardens except in the areas blocked by the design, creating a stencil on the screen.
Step 3: Setting Up the Screen
Once the screen is prepared, it’s placed on the substrate (such as a t-shirt or paper) you want to print on. The screen needs to be tightly clamped to avoid movement during printing.
Step 4: Applying Ink
Ink is placed at the top of the screen, and a squeegee is used to press the ink through the open areas of the stencil. The ink only transfers to the areas of the substrate where the stencil allows it to pass through.
Step 5: Curing the Print
Once the ink is applied, it needs to be cured to ensure durability. For fabric, this typically involves heat-setting the ink with a heat press or conveyor dryer, allowing it to adhere permanently to the fabric.
To get started with screen printing, you'll need some key materials and equipment. These include:
Screens and Frames: The screen is a woven mesh stretched tightly over a frame. Polyester is the most common material for the mesh.
Inks: Screen printing inks come in various types, such as water-based, plastisol, and discharge inks. Each has its own benefits depending on the material you're printing on and the look you're aiming for.
Squeegee: This tool is used to apply pressure to the ink, pushing it through the mesh and onto the surface.
Emulsion and Emulsion Remover: Emulsion is used to create the stencil on the screen, while the remover helps to reclaim the screen for future use.
Exposure Unit: A specialized light source used to harden the emulsion, allowing the stencil to be created on the screen.
Printing Press: While manual presses work for small runs, automated presses allow for high-volume production.
Heat Press or Conveyor Dryer: This equipment is used to cure the ink after printing, ensuring it adheres permanently to the material.
Screen printing can be done in several different ways, depending on the materials and the effect you’re trying to achieve. Here are the most common types:
1. Spot Color Screen Printing
This is the most basic type of screen printing and involves using a single color for each layer. Each color is applied one at a time, and the colors are aligned to create the final design.
2. CMYK (Process Printing)
CMYK screen printing involves using four colors—cyan, magenta, yellow, and black—to create full-color prints. By layering these colors in different proportions, you can create the appearance of a wide range of colors.
3. Halftone Printing
Halftone printing is a technique used to create gradients or shaded areas by using dots of varying sizes. This allows you to create the illusion of shading and depth without using additional colors.
4. Discharge Printing
Discharge printing involves using a special ink that removes the dye from the fabric rather than adding ink on top of it. This is commonly used on darker fabrics to create a soft, vintage look.
5. Water-Based Printing
Water-based inks are more environmentally friendly than traditional plastisol inks, as they are free of harmful chemicals. They also create a softer print, as the ink soaks into the fabric rather than sitting on top of it.
Screen printing is a craft that allows for a lot of experimentation. Once you master the basic process, you can start exploring more advanced techniques to create unique designs. Some of these techniques include:
1. Simulated Process Printing
This technique mimics the look of a full-color design using fewer colors, typically achieved through halftones. It's commonly used for printing realistic images onto dark fabrics.
2. Puff Ink Printing
Puff ink is a special type of ink that expands when heated, creating a raised or textured effect on the print.
3. Metallic Ink Printing
For designs that need to stand out, metallic inks give a shiny, reflective finish that can add a luxurious touch to your prints.
4. Glow-in-the-Dark Printing
Glow-in-the-dark inks are another way to add a unique effect to your prints. These inks absorb light and glow when placed in the dark.
Now, let's dive into the actual process of screen printing step-by-step. This guide will help you get started, even if you're a beginner.
Before anything else, you'll need a design. Use graphic design software like Adobe Illustrator or Photoshop to create your artwork. Once the design is finalized, print it onto a transparent sheet, which will be used to create the stencil.
Take your screen (which is a mesh stretched over a frame) and apply a thin layer of emulsion on it using a scoop coater. The emulsion is light-sensitive and will harden when exposed to light.
Place your design (on the transparency) on the emulsion-coated screen, and expose the screen to a light source. The light will harden the emulsion, except in the areas blocked by the design. After exposure, wash the screen with water to reveal your stencil.
Once your screen is dry, set it up on your printing press (or a simple hinged frame if you're doing it manually). Ensure your substrate (such as a t-shirt or paper) is positioned correctly under the screen.
Pour the ink at the top of the screen, and use a squeegee to press it down and across the screen. The ink will pass through the open areas of your stencil and transfer onto the substrate.
After printing, you need to cure the ink to ensure it adheres permanently to the material. For fabric, this usually involves using a heat press or conveyor dryer to apply heat, setting the ink.
Like any craft, screen printing comes with a learning curve. Here are some common mistakes beginners make and how to avoid them:
Screen printing isn't limited to t-shirts or posters. There are countless creative applications for this versatile technique:
Starting a screen printing business can be a rewarding venture. Here's a roadmap to help you get started:
Start by outlining the type of products you want to print, your target market, and your business goals. A solid business plan will guide your decisions and help you secure funding if needed.
You'll need to invest in quality equipment to ensure professional results. Look for a printing press, exposure unit, curing equipment, and quality inks and screens.
Before launching, create sample designs to showcase your capabilities. These can be printed on t-shirts, posters, or other items that reflect your unique style.
Use social media platforms, especially Instagram, to showcase your designs. Reach out to local businesses, artists, and events that may need custom printing services.
As demand grows, consider expanding your offerings to include new printing techniques, or invest in automation to handle larger orders.
The world of screen printing is constantly evolving. Here are some future trends to watch out for:
Screen printing is a powerful and versatile method of printing that has stood the test of time. Whether you’re looking to start a business, create custom designs, or explore new creative outlets, screen printing offers endless possibilities. With the right materials, techniques, and a little practice, you can master this ancient art form and make your mark in the world of printing.
Remember, practice makes perfect in screen printing. The more you experiment, the more you’ll learn, and soon you’ll be producing high-quality prints with confidence!


